
|
So, you hate your day job and are wondering about whether you could make a nice income from your art or craft so you could hand in your notice and just create all day?
Sounds nice, doesn't it. However, will it be so good when your studio is below freezing, your fingers are so cold that even a cup of tea and thermals aren't defrosting you, and you've got 20 of those things to make and sell by the end of the month just so you can put dinner on the table? It's not just sitting and making pretty things while thinking happy fluffy arty thoughts, you also have to be able to do marketing, business planning, project management, photography, selling, administration, accountancy, self discipline and motivation ... the list goes on! You need to build up savings to cover holidays and time off sick, and you have to sort out your own tax and pension. You need to have enough room to create and to store your creations, which may mean hiring studio or storage space. Even if you are just looking at "selling a few things I have made to get some spending money for my next holiday", or "my friend wants to pay me to make her some cushions", or "it's just one christmas fair as the PTA wanted to bump up the numbers", you are still selling, so you need to register as self employed, which means filling in a tax return. You also need insurance. If you've read all this and it still excites you, then go for it! Even if you're just doing one fair, please price your work fairly. Please take into account the time it took you to design, make, photograph and package it, and pay yourself a decent living wage on top of the cost of the materials. There's nothing to stop you doing special deals for your friends, but do let them know it's a special deal otherwise all their friends will want one at that price too! There are lots of resources out there to help you if you do want to start your own business. Here's a few of the ones I've found the most useful: Tax
Insurance
Business Resources
Storage and Studios
1 Comment
You may be one of the lucky people who has decided to take the plunge and get into glass fusing. Well done! You're in for a fabulous, exciting (and expensive!) ride down the fusing slope. How can I melt stuff? Where do I start? Several places sell "microwave kiln kits" which can be a good place to start if you're on a limited budget and want to make jewellery. The kits are likely to contain sheet glass, firing paper (stops the glass sticking to your kiln), gloves (essential), safety glasses (essential), a glass cutter, and other exciting things to make your life easier and your work prettier. It is a really good idea to have a dedicated microwave for your kiln, and you can often pick these up secondhand locally. One with a digital readout that you can program in minutes AND seconds is really helpful, or just use a stopwatch! A word about safety: When you are handling or opening your kiln, ALWAYS wear your safety glasses and your gloves. It's also a good idea to wear natural fabrics, as artificial fibres (nylon / polyester etc.) will melt and stick to your skin if they get too hot. Get prepared before you start firing - always make sure that you have somewhere to put your kiln when you take it out of the microwave (an old marble or granite tile from a kitchen supply shop is perfect!) (An example of a microwave kiln starter kit) 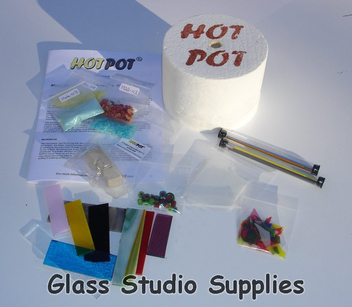 Types of Glass ... Bullseye / Spectrum / Float / Bottles ... argh! You can use any of these types of glass, but NEVER mix them together. Different types have different COE (coefficient of expansion) which means that they expand and contract differently when you heat them up. This means that if you mix them they will shrink differently when they cool down and crack your creation. Even the tiniest bit of cross-contamination can ruin a piece, so do practice good glass hygiene! Spectrum is the softest (COE96), then Bullseye (COE90), then Float (window glass) and Bottle glass are the hardest. Harder glass takes longer to melt. You can get loads of pretty bits (frit / confetti / millefiori) to make fabulous things, but bear in mind that these are also made from glass so you can only use them with the same COE of sheet glass. The COE of Float and Bottle glass varies a lot, so only use pieces from the same sheet or bottle together, don't mix them. Cleaning your Kiln: When you are cleaning your kiln (removing the old firing paper), ALWAYS wear your dust mask and work in a well ventilated area. The ceramic fibres are really teeny and it's not good for you to breathe them in. Don't put old firing paper down the sink. It will clog it up. Instead, tip the old firing paper (which turns into powder during the firing) into a pot of water - it will sink to the bottom and then you can tip off the water and put the sludge in the bin. You can use a soft brush to make sure your kiln is clean. The best way I've found to do this is to get a small bucket and a big resealable bag. Put the resealable bag in the bucket and fill the bag about half full with water. Then you can use it to hold your old kiln sludge, and when it starts getting full you just tip off the clear water, seal up the bag and put it in your general waste bin. Repairing your kiln: If the inside of your kiln gets chipped or damaged, talk to your local glass supplier (list at bottom of page) for safe ways to repair it. It is possible. Limitations: Microwave kilns are cute and a great place to start, but you'll have trouble doing things much over pendant size if you want them to stay in one piece long-term, as the temperature you need to anneal your glass at is very specific and can only really be achieved by using a kiln with a digital controller. The best way to start to understand how things will come out of your kiln is to write down what wattage you used, for how long (minutes AND seconds!), what glass was in it, how big it was and how many layers, and take pictures of before and after and stick them in a notebook. Oh, and microwave kilns really don't heat evenly ... I tried doing a slump (bending the glass into a ceramic mould to make a little dish) in mine and it didn't work at all ... part of it went down and the rest stayed sticking straight out!!! You can "calibrate" your kiln by spreading little 1cm squares all over the firing surface and seeing how different they are when they come out. The golden rule is once you have finished firing and put the kiln to the side (on a heat resistant surface) to cool down, DO NOT PEEK AT ALL for at least two hours, and preferably leave it overnight. This will allow it to cool gently and make your pretty things less susceptible to thermal shock. There are loads of helpful videos on Youtube. Your next kiln: When you look at moving up, I'd recommend the Paragon SC2 as a first "proper" kiln - It's friendly, has a digital controller and takes up less counter space than your second microwave! You can make things like coasters, suncatchers, small dishes and jewellery in it. I have one and, even though I have now upgraded to a larger kiln, I still use it a lot for making samples and small things. If you're not sure what to get, have a chat to your local friendly fused glass supplier. I've put a little list here to get you started: (UK Suppliers: Glass Studio Supplies, Warm Glass, Creative Glass Guild, Reading Stained Glass, Tempsford Stained Glass, Creative Glass Shop, among others.) Good luck! Always remember YMMV (Your Microwave May Vary!) Disclaimer: You are responsible for your own safety. Read carefully and follow the instructions which come with your kiln. Always wear your safety glasses and gloves when working with hot glass. |
Jane Cameron
Experienced silk painter, glass fuser, teacher, enthusiastic and inspirational. Archives
June 2019
Categories |
 RSS Feed
